A successful app has many different types of users, each with their own needs. Employees, Managers and Administrators all require unique levels of access to maintain data privacy and should be able to perform tasks assigned to their role. I will show you how to design a role-based user interface in Power Apps that adapts to the person using the app.
Site Inspections App
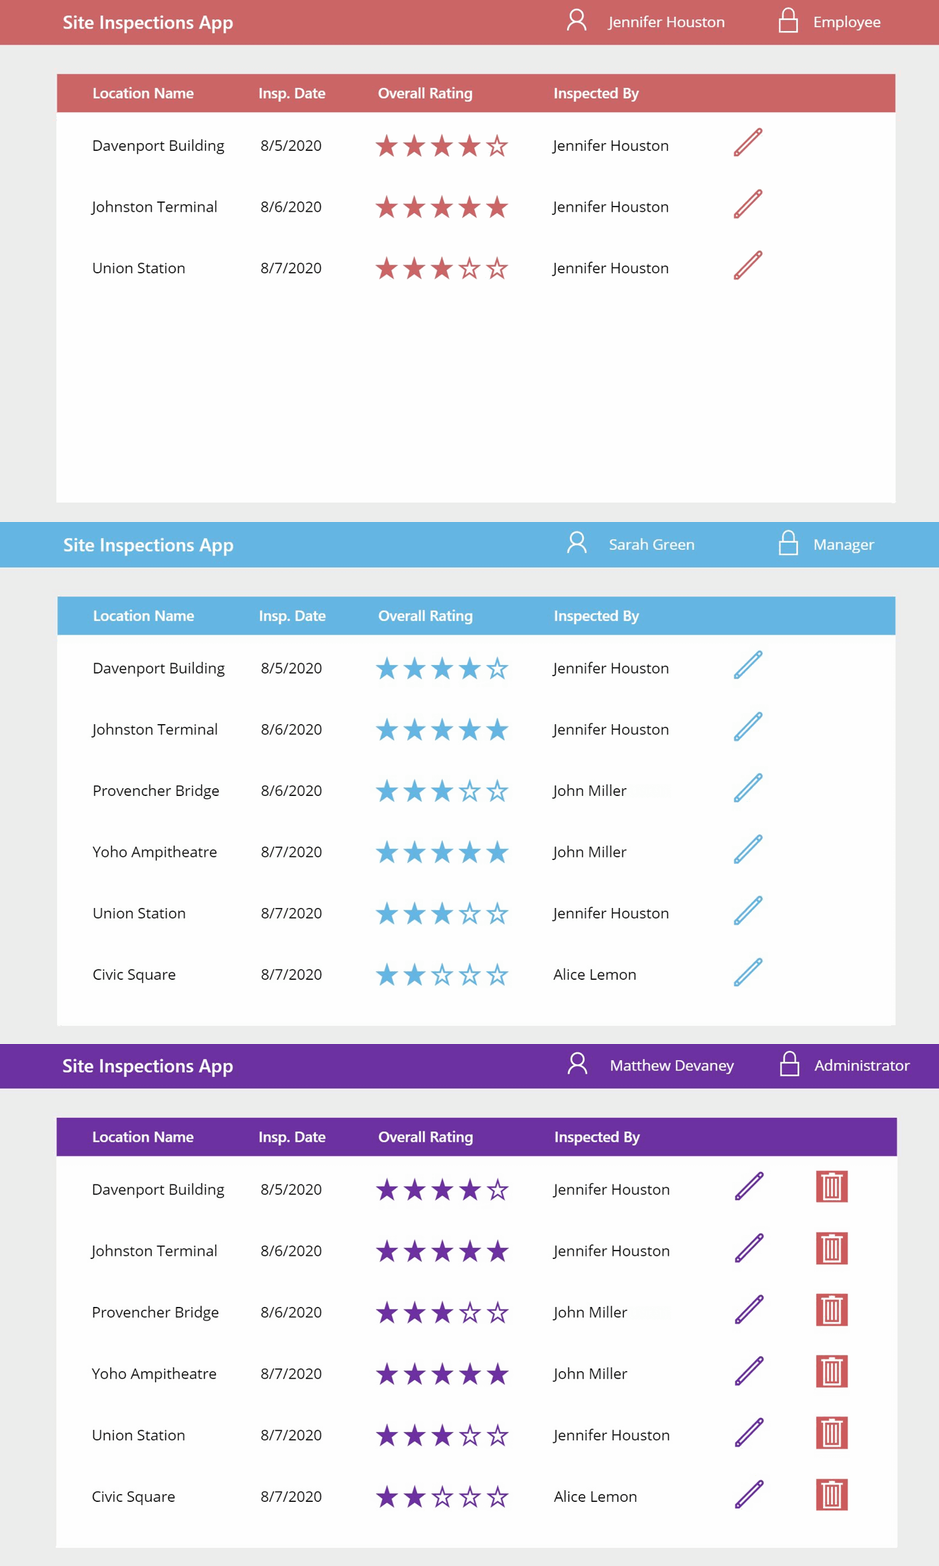
The ‘Site Inspections App’ is used by the quality control department of a restaurant-chain to track the result of on-site audits. Inspectors should only be able to see their own records whereas the manager has the ability to view all records. An administrator also has the unique ability to delete a record if needed.
We will build the ‘Site Inspections App’ to look like the image below. I have used a different color scheme for each role but my instructions do not include how to do this.

Make a new SharePoint list called ‘App Users‘ with two columns: User (Person column type) and Role (Choices column type) with the options Employee, Manager and Administrator. Any people in the User column will need to exist within your organization so you will need to choose different names than I do.
| User | Role |
| Jennifer Houston | Employee |
| John Miller | Employee |
| Alice Lemon | Employee |
| Sarah Green | Manager |
| Matthew Devaney (your name) | Administrator |
Open Power Apps and create a new Canvas App From Blank called Site Inspections App.
When the user starts the app we need to determine their user details (varUser) and role (varRole). Put this code in the OnStart property of the app.
// Obtain username and email of the logged-in userSet(varLoggedInUser, User());// Find the user with a matching email in the App Users listWith( {wUserRecord: LookUp('App Users', User.Email=varLoggedInUser.Email)}, Set(varUser, wUserRecord.User); Set(varRole, wUserRecord.Role.Value));// If matching user is not found, insert a new user into the list with the role EmployeeIf(IsBlank(varRole), With( {wUserRecord: Patch( 'App Users', Defaults('App Users'), { User: { '@odata.type':"#Microsoft.Azure.Connectors.SharePoint.SPListExpandedUser", Claims:"i:0#.f|membership|"& varLoggedInUser.Email, Department: "", DisplayName: varLoggedInUser.FullName, Email: varLoggedInUser.Email, JobTitle: "", Picture: "" } } ) }, Set(varUser, wUserRecord.User); Set(varRole, wUserRecord.Role.Value) ));Now we will display the User’s name and role in the app.

Place a Person icon on the Title bar. Then insert a label beside it with the following code in the Text property:
varUser.DisplayNameAlso add a Lock icon to the Title bar. The label beside it should have this code in the Text property:
varRoleYour name and role should now appear in the app. If you want to use the app as another person (example: Jennifer Houston) for testing purposes simply hard-code their email in the app’s OnStart property as shown below.
Set(varLoggedInUser, User());With( {wUserRecord: LookUp('App Users', User.Email="[emailprotected]")}, Set(varUser, wUserRecord.User); Set(varRole, wUserRecord.Role.Value));Then run the app’s OnStart property to see the changes take effect. Remember to remove the hard-coded employee email before publishing the app.

Filter Records Based On User Role
An employee should only be able to view their own records in the app whereas a manager or an administrator can see all records in the datasource.
Build another SharePoint list called ‘Site Inspections’ with the following columns: LocationName (single-line text), OverallRating (number), InspectionDate (date), InspectedBy (person)
| LocationName | OverallRating | InspectionDate | InspectedBy |
| Davenport Building | 4 | 8/5/2020 | Jennifer Houston |
| Johnston Terminal | 5 | 8/6/2020 | Jennifer Houston |
| Provencher Bridge | 3 | 8/6/2020 | John Miller |
| Yoho Ampitheatre | 5 | 8/7/2020 | John Miller |
| Union Station | 3 | 8/7/2020 | Jennifer Houston |
| Civic Square | 2 | 8/7/2020 | Alice Lemon |
In Power Apps, create a new connection to the ‘Site Inspections’ SharePoint list. After that, insert a gallery onto the screen with ‘Site Inspections’ as the datasource. Format the gallery to display information as shown in the image below using labels, an edit icon and the rating control. Add a label above the gallery to act as a header row.

Jennifer Houston is has the role Employee so she should only see 3 records. Put this code in the Items property of the gallery.
If( varRole="Employee", Filter('Site Inspections', InspectedBy.DisplayName=varUser.DisplayName), 'Site Inspections')Now she can only view her own records.

Whereas the Manager Sarah Green can see every record.

Give Different Abilities Based On User Role
An Administrator is the only role which has the ability to delete records from the datasource. Add a Delete icon to the gallery as shown in the picture below.

Then use this code in the Visible property of the Delete icon
varRole="Administrator"The Delete icon will show for the administrator and disappear for employees and managers making it impossible to click.

Did You Enjoy This Article? 😺
Subscribe to get new Power Apps articles sent to your inbox each week for FREE
Questions?
If you have any questions or feedback about designing a role-based user-interface in Power Apps please leave a message in the comments section below. You can post using your email address and are not required to create an account to join the discussion.